 Coding help for the harder learners!
| |||||||||||||||||||||||||||||||||||||||||||||||||||||||||
|
C# (C-Sharp) Tutorial A Tour of C# Express EditionBefore we move on to learning to develop applications with the installed software, we shall take a quick look at the IDE that we will be using, Visual C# Express Edition. An IDE is an Integrated Development Environment that has all of the tools to allow you to create and develop applications. In this section we will discover some of what C# Express has to offer the developer. How to use the Start page How to use the Start pageThe Start Page is displayed when you start the IDE. From this page, you can open existing solutions or create new solutions. You can also see what is newly available from Microsoft, or open one of several Help sections. The Start Page is actually a web browser built into the IDE. The browser is displayed whenever you access the Start Page or when you are accessing Help information. You can return to the Start Page at any time by choosing Other Windows from the View menu, then by selecting Start Page. The Start Page is divided into 4 sections that perform different tasks for the developer when the IDE is first opened.
Visual C# Express - Start Page
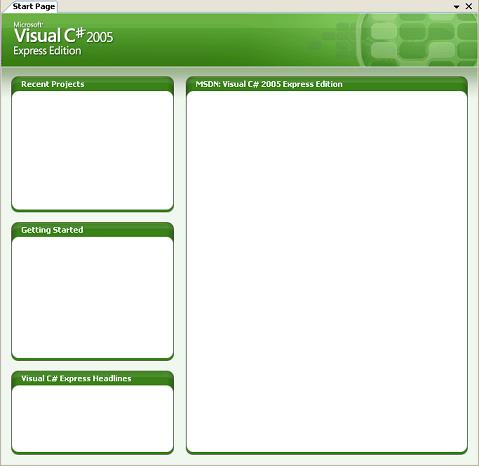 Figure 2-1: Visual C# Express Start Page
Solutions and ProjectsBefore we get started developing our first application, an understanding of the differences between a solution and a project is required. A project holds source files and any other files, such as images, that are needed to create an assembly that is to be run by the .NET Common Language Runtime. All of the source files in a project are compiled together to create a single assembly. The assembly may be an executable (.exe) or a dynamic link library (.dll). A solution can hold one or more projects, but often contains just a single project. If this is the case, then there is really no difference between a solution and a project. A solution that contains more than one project is suitable for large applications that are developed by more than one person. This allows individuals or small groups of developers to independently work on the projects that make up the solution. < Friday November 16, 2007 ntercol">To create a new project, either click on the new projects label in the Recent Projects window or choose New Project from the File menu. Alternatively you can use the keyboard shortcut by pressing the control, shift and ‘N’ keys at the same time. This latter method is one of a number of keyboard shortcuts that are available in the Integrated Development Environment and are shown in the following manner;
How to open and close existing projectsTo open a project, either click on a recent project on the Start page, or choose Open Project… from the File menu. Alternatively, the keyboard shortcut is;
To close a project, you actually need to close the solution that it is a part of. To do this, choose Close Solution from the File menu. This may seem confusing that we refer to closing a project, by clicking on the Close Solution menu item, but remember that by closing the solution, we are also closing all of the projects within it. There is no shortcut associated with closing a project, however if you wish to close the whole application then this can be achieved using;
The Open Project Dialog
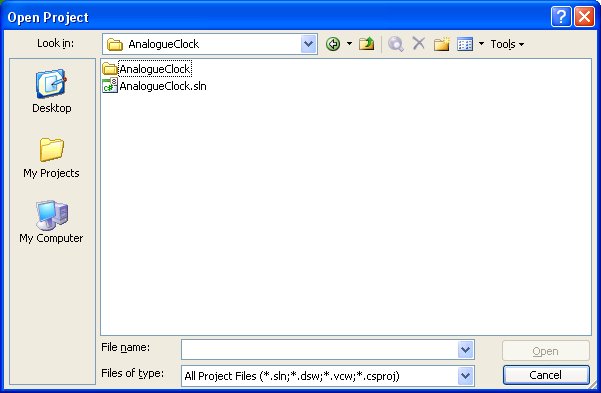 Figure 2-2: The Open Project Dialog
How to work with the IDEWhen you create a new project, or open an existing one, the IDE will look similar to the next screen shot. In this example, the Forms Designer window is displayed showing a new empty windows form. You use this window to develop the user interface of the application. The Code Editor window is opened by right-clicking on the form and selecting View Code, alternatively you can use the keyboard shortcut F7 or select Code from the View menu. This allows you to edit the code behind the objects that you place on the form. To view the code that the designer creates, you need to open the associated '.Designer.cs' file. To change from the Code Editor window back to the Forms Designer, either right-click on the code window and choose View Designer, use the keyboard shortcut Shift+F7, or choose Designer from the View menu. The screen shot also illustrates some of the other windows that you use to develop applications, and how these windows can be manipulated. On the left hand-side and the far right-hand are collapsed windows that can be opened or closed as needed to allow more room in the Forms Designer and Code Editor windows. The Forms Designer window allows you to edit the user interface of the windows application that you are developing. Objects such as buttons and textboxes may be added quickly allowing you to rapidly create an application with only needing to add a few lines of code yourself. The standard toolbar, like any other windows application, allows you to perform a variety of operations without the need to navigate through the menu system. The usual buttons for New, Open and Save are accompanied by the likes of Build and Run. The most common features of the application appear on the toolbar. The properties window allows you to easily edit the properties of controls when developing windows applications. We will look at this in more detail when we create some windows applications. C# Express IDE displaying the Windows Form Designer
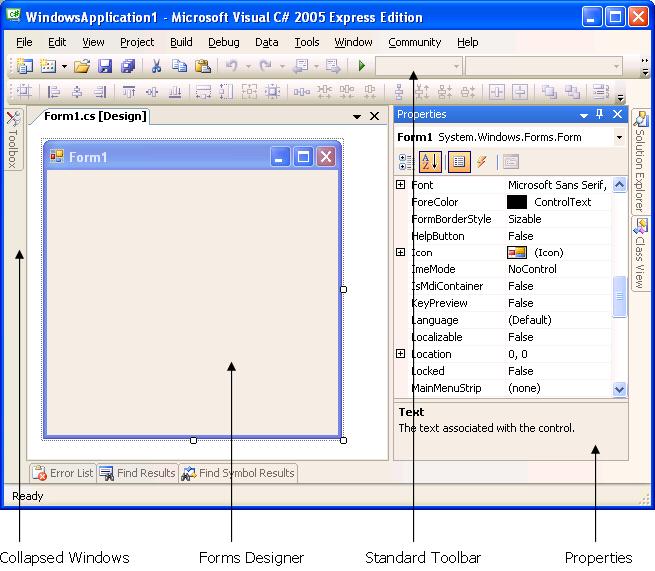 Figure 2-3: Components of the IDE
Working with the Code EditorThe Code Editor window lets you create and edit source code when working on any type of application. If you are working on a windows application then you can flip back to the Forms Designer by right-clicking on the code window and selecting View Designer, using the keyboard shortcut Shift+F7 or by selecting Designer from the View menu. The Code Editor is used to write the statements that do the work in the application. It looks like any other text editor, but has several special features that simplify the task of editing source code. For example, syntax highlighting changes all of the keywords in the language that you are using to a different colour to distinguish them from your own code. Also, all comments are coloured green to make them stand out from the rest of the source code. The Code Editor has built in Intellisense/code-completion, so that you do not have to remember every method that is associated with an object. The Intellisense shows what methods are available to the object and what they each do if comments are supplied. In addition to Intellisense, the editor allows you to select and member of a class from the drop down boxes at the top of the code editor windows. The left hand box allows you to select the class that you want, while the right hand box allows you to select the member you wish to go to. In the case of partial classes, any member that is located in the other file of the class is shown in grey (as shown below).
 Figure 2-4: Selecting members of a Class Another nice feature is code folding. The editor allows you to minimise a method or class into a single line (more on this later). The Code Editor is where all of the hard work is done when developing applications and when used in conjunction with the Forms Designer window, this allows you to rapidly develop applications for both the windows and web environments. C# Express IDE displaying the Code Editor
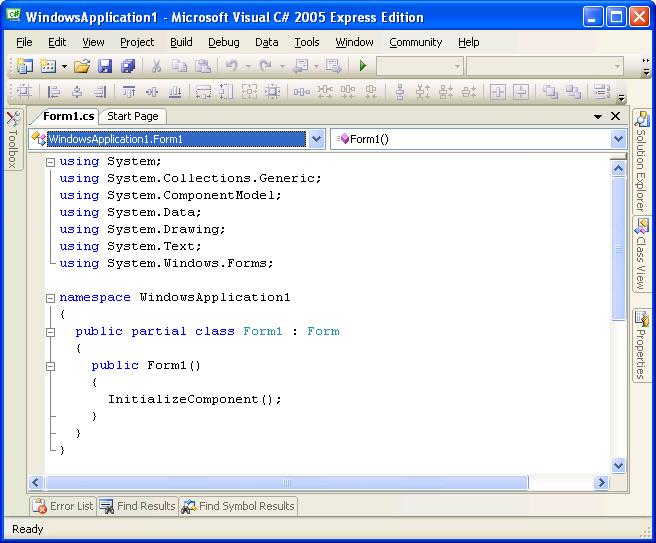 Figure 2-5: The Code Editor Window
IntellisenseCode completion or IntelliSense as it is often referred to, is a powerful feature that can dramatically increase your productivity when developing an application. It is designed to make the development of your application much easier by helping you automatically generate code in the Code Editor. When you type a recognized word into your code editor, such as System, followed by the dot operator, C# Express displays a drop down list of all the members associated with the class or namespace. This allows you to easily find the member that you are looking for by scrolling down the list without having to remember all of the members for a particular object. Here is a list of what the icons mean.
Using IntelliSenseWhen you are writing code in the Code Editor window, type the name of a namespace or class followed by the scope operator, also known as the dot operator (.). IntelliSense displays all valid members in a scrollable list. This list can be navigated by either the mouse or by using the arrow keys. If you know the first few letters of the member name, begin typing them to jump directly to the member in the list. When you have located the member that you wish to use, then there are several methods of inserting the selected member in your code;
Press Esc at any time to close the member list. This will leave whatever characters that you have already typed in the Code Editor, so in order to open the Intellisense again, these will need to be deleted back to the end of the namespace or class. When you select an item from the member list, but before you insert it, you are shown a Quick Info box on the item and any code comments for the item. The code comments are not shown for any classes that are not in the .NET Framework. The information supplied in the Quick Info allows you to decide if this is the right member that you wish to insert in the code or whether a different member is needed. Intellisense in Action
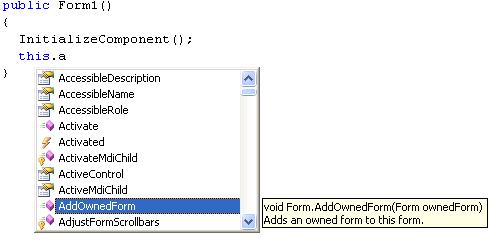 Figure 2-6: Intellisense
Code FoldingThis is one of those nice features which makes you appreciate having an IDE instead of using notepad. Code folding allows you to minimise chunks of code into a single line, so that the Code Editor window does not become too cluttered or overly long. The IDE automatically groups the code at various boundaries (method, property, class, structure, interface, and namespace bodies). It then allows you to expand/collapse the regions of these code body groups using the familiar plus/minus sign used in the tree-view control (e.g., in Windows Explorer) which allows you to fold (collapse)/unfold (expand) the code regions. You can also define your own regions to be folded using #region and #endregion keywords. These can encapsulate as many methods or program statements as you wish. When you define a region, any text that appears to the right of the #region keyword is considered to be the name of the region. This may be more that a single word and can be used to write a short description of the code inside the folded region. An ExampleWhen you create a console application using C# Express, the default code is a simple empty application. The code contains a single method that looks like the following code snippet. On the left hand side of the code is a minus symbol that can be clicked on to reduce the code, indicated by the line below it, into a single line.
 Figure 2-7: Unfolded Code When the code is folded, it now looks like the following code snippet. Clicking on the plus symbol will unfold the code back to its previous state.
 Figure 2-8: Folded Code In this manner, code can be reduced to a set of high level statements with all of the intricate code hidden within the folded code. Often this can reduce the amount of information that you are reading into a more manageable block Code Folding in Action
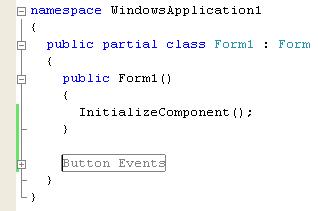 Figure 2-9: Code Folding
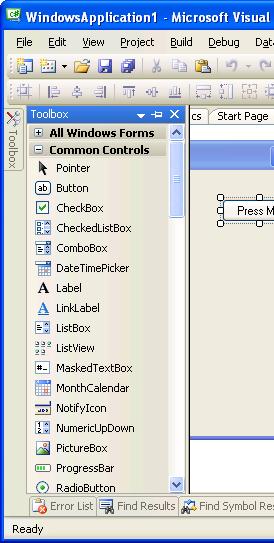
Collapsing and Expanding WindowsIn order to allow more space for the Form Designer or the Code Editor windows, several of the windows that you work with may be collapsed to the sides or bottom of the IDE. This allows easy access to the windows without making the central space that you work with tiny. This can be especially useful when running a monitor at the resolution of 1024x768. The windows that can be collapsed are listed in the View menu. They collapse to one of the sides previously mentioned. By default they are: Left Hand Side: Toolbox Right Hand Side: Solution Explorer, Class View, Properties Bottom: Error List, Find Results, Find Symbol Results, Output Opening a windowWhen you first open C# Express, not all windows are available to the developer. In order to open them, choose the relevant window from the View menu. This will open the window for you to use. When you click on either the Form Designer or the Code Editor, the window collapses to its appropriate position. When a window is in its collapsed state, it may be opened by hovering the mouse over it, or by clicking on it. Pinning a windowIn order to get the window to stay on top, you will need to pin the window, by clicking on the symbol next to the exit cross which looks like a pin. When you do this, the collapsed windows appear as tabs on the right or left areas. Collapsing a windowIf a window is opened by hovering the mouse over the collapsed window, then as soon as you move the mouse away, the window will collapse again. If the window was opened by clicking on the collapsed window, then when you click on either the Form Designer or the Code Editor, the window will collapse back to its appropriate position. If a window is pinned, then unpinning it will collapse all of the windows on that side back to the collapsed state Closing a windowIn order to close the window, you first need to put it into its un-collapsed state and then close it using the cross like any other application window Displaying Windows
|
|||||||||||||||||||||||||||||||||||||||||||||||||||||||||
 |
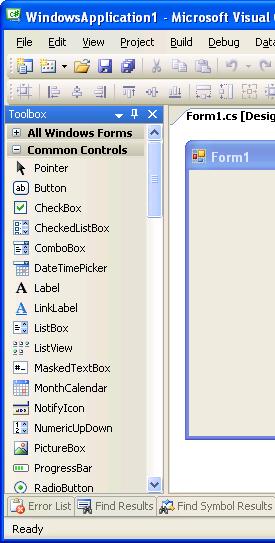 |
Collapsing windows allows more space for the Form Designer or the Code Editor.
Open a window by choosing one from the View menu.
A window may be opened by hovering the mouse over it, or by clicking on it when it is in its collapsed state.
You pin a window by clicking on the pin symbol next to the exit cross.
When you click on either the Form Designer or the Code Editor, the window will collapse back to its appropriate position.
The Solution Explorer window shows which files make up the project you are working with and allows you to open any of them by double-clicking on the item. A single solution and its projects appear in a hierarchical display, similar in nature to windows explorer, allowing you to open and close each node of the project by use of the '+' and '-' signs.
The Solution Explorer supports a variety of management commands (item dependant). For any specified item, the project type determines which management commands are available. For example, if you select a file in a Project, you can use the Delete command to delete the file permanently. To access the management commands, select an item in the Solution Explorer and right-click on it. If you right-click on a '.cs' file (not a form or a control), you get a menu containing nine items.
Open - This opens the selected file within the C# Express IDE on a new tabbed window or if it is already open, then it sets the window as the top-most window.
Open With… - This allows you to choose which application you wish to open the file with. You can also setup the default editor for the file type.
View Code - This opens the code within the C# Express IDE on a new tabbed window or if it is already open, then it sets the window as the top-most window.
Exclude From Project - This allows you to remove an item from the solution without permanently deleting the file.
Cut - This allows you to remove a file from the project, whilst holding a copy in clipboard. (This can then be pasted into another project).
Copy - This allows you to copy a file into the clipboard memory and paste it either into the same project as a copy, or into a new project.
Delete - This allows you to permanently delete a file from the project. (Caution, the file will be deleted from the project folder as well).
Rename - This allows you to rename a file and all of the references to it within the project.
Properties - This allows you to edit the properties of the file.
If you right-click on a '.cs' file that is a form or a control, you get the previous nine menu items plus one more:
View Designer - This opens the Forms Designer window on a new tabbed window or if it is already open, then it sets the window as the top-most window.
You can tell the difference between a '.cs' file that is just a class and one that is a form or control by looking at the icon associated with the file. It is also a good idea to have a good naming convention so that you can tell what are forms or controls at a glance.
Each of the other elements of the solution allow you to do similar functionality. For example if you right-click on the Properties folder, you can simply open it.
When you have more than one project contained within a solution, then the startup Project Name (the one that will be run when you press F5) will be shown in bold text. If there is only one project in the solution as shown in the next diagram, then the Project Name will be in bold.
The toolbar contains five buttons; Properties, Refresh, Show All File, View Code and View Designer.
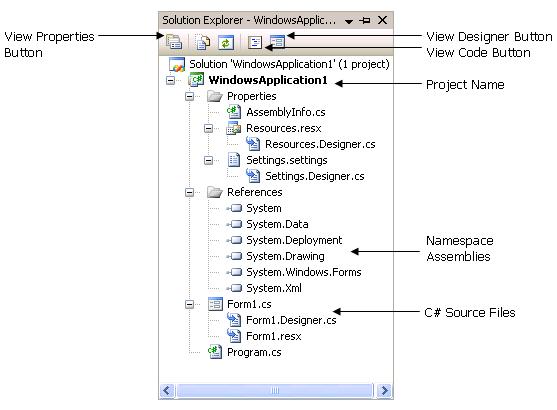
The solution explorer lists all of the files that make up the solution.
When C# Express is first loaded, the Solution Explorer is empty.
The Properties button displays the Properties Explorer.
The Refresh button refreshes the current files.
The Show All Files button displays all of the files including those in the bin and obj directories.
The View Code button displays the code for the currently selected file. (This is only available to .cs and .resx files).
The View Designer button displays the form of the currently selected file. (This is only available to windows forms and controls).
The startup project name is shown in bold.
The namespace assemblies are compiled code that your application can use.
The solution explorer is the place to add new objects to your project, remove objects or even add a new project to the solution.
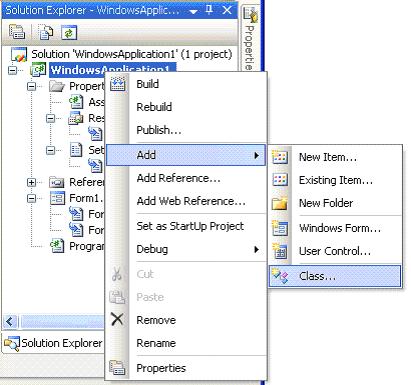
To add a class to a project, you can either use the menu system or the solution explorer. To use the menu system, select Add Class... from the Project menu or use the keyboard shortcut Shift+Alt+C. To add a class using the solution explorer, right-click on the project that you wish to add the class to, select Add from the menu and the click on Class (as shown in Figure 2-12). The Add New Item menu will be displayed with the default name of class1.cs in the file name.
The Add sub-menu in the solution explorer also allows you to add other items to your application including items that already exist. When you add an existing item, it does not have to be in the same folder as your application. By adding the item, the IDE makes a copy of the code in the working folder of the application.
Adding a Form or Control to a project is either done via the Project menu or by right-clicking on the project. There is no keyboard shortcut associated with this action.
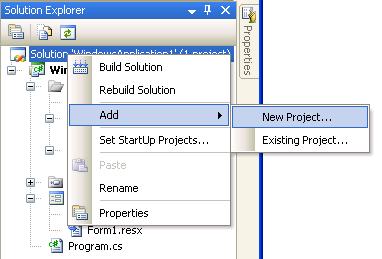
To add an existing or new project to a solution, simply right-click on the solution (as shown in Figure 2-13), then select Add from the menu followed by either New Project... or Existing Project....
To change which project in a solution is the startup project, simply right-click on the project that you wish to be the startup one, then select Set as StartUp Project.
Todo
Todo
Todo
Todo
Todo
Todo
Todo
Todo
By now you should have a basic understanding of how to manipulate different parts of the C# Express IDE.
When you develop applications with C# Express, you are using an Integrated Development Environment (IDE). The IDE contains all of the tools you need to develop .NET programs using Visual Basic, C# or C++.
The Start Page is displayed by default when you start Visual C# Express Edition. t contains four areas that let you work with projects, access areas of help, see what is making the headlines and hook into an RSS feed from MSDN.
A solution can hold one or more projects, but often contains just a single project. To work with the files in a project, you use the Solution Explorer.
A solution may contain projects that are written in more than one .NET supported language, although C# Express does not give you the ability to do this.
The Code Editor window is where source code is written that does all of the hard work in the application.
IntelliSense can dramatically increase your productivity when developing an application.
Code folding can reduce the amount of information that you are reading into more manageable chunks of information.
Collapsing windows allows more space for the Form Designer or the Code Editor.
The solution explorer lists all of the files that make up the solution.
| <<Back | Contents | Next>> |